Easy Chocolate Sourdough Bread in Cups – Step-by-Step Guide
Imagine biting into warm, tender chocolate sourdough bread with deep cocoa richness balanced by that signature tangy kick. These individual chocolate sourdough bread cups are absolutely life-changing! I discovered this recipe during a rainy weekend when I wanted something special but didn’t want to commit to a full loaf.
The beauty lies in their perfect portion size and stunning presentation. They’re surprisingly simple to make, taking just about 30 minutes of active prep time, making them ideal for busy families or anyone craving homemade goodness without the fuss.
What is Chocolate Sourdough Bread in Cups?
Ever wondered what happens when classic sourdough meets chocolate indulgence in cute individual servings? That’s exactly what chocolate sourdough bread in cups delivers! These aren’t your typical muffins or cupcakes. They’re sophisticated little bread portions baked in cups or ramekins, featuring the complex flavor of sourdough starter mingled with rich chocolate.
Why cups, you ask? Because presentation matters, and these adorable portions make everyone feel special. As they say, the way to anyone’s heart is through their stomach, and these beauties definitely deliver on that promise! Ready to become the hero of your next brunch gathering?
Why You’ll Love This Chocolate Sourdough Bread in Cups
The Perfect Marriage of Sweet and Tangy
The standout feature of this chocolate sourdough bread in cups is the incredible flavor balance. The natural tanginess from the sourdough starter cuts through the sweetness of chocolate, creating a sophisticated taste that’s neither too sweet nor too sour. It’s like having dessert and artisan bread in one bite!
Budget-Friendly Homemade Goodness
Making these at home saves you serious money compared to buying individual artisan breads at bakeries. Most ingredients are pantry staples you likely already have. Plus, you control the quality of chocolate you use. I typically spend about $8 making a batch that yields 6-8 portions, whereas buying similar items at a bakery would cost at least $4-5 per piece.
Customizable Toppings and Mix-Ins
The versatility is endless! Fold in chocolate chips, add a swirl of hazelnut spread, sprinkle with sea salt, or top with chopped nuts. Each cup becomes your canvas. If you enjoyed my sourdough cinnamon rolls, you’ll absolutely adore how these cups allow for similar creative freedom while offering a completely different texture and experience.
Making these at home means you can adjust sweetness levels, experiment with dark or milk chocolate, and even create variations for different dietary needs. Trust me, once you master this recipe, you’ll want to bake them every weekend!
How to Make Chocolate Sourdough Bread in Cups
Quick Overview
This recipe delivers rich, chocolate-laden bread with a tender crumb and that characteristic sourdough tang. The beauty is in the simplicity.
Each cup features a beautifully risen top with a soft, almost cake-like interior that’s still distinctly bread-like in texture.
Total Time:
- Prep Time: 20 minutes
- First Rise: 4-6 hours
- Shaping & Second Rise: 1-2 hours
- Baking Time: 25-30 minutes
- Total: About 6-8 hours (mostly hands-off time)
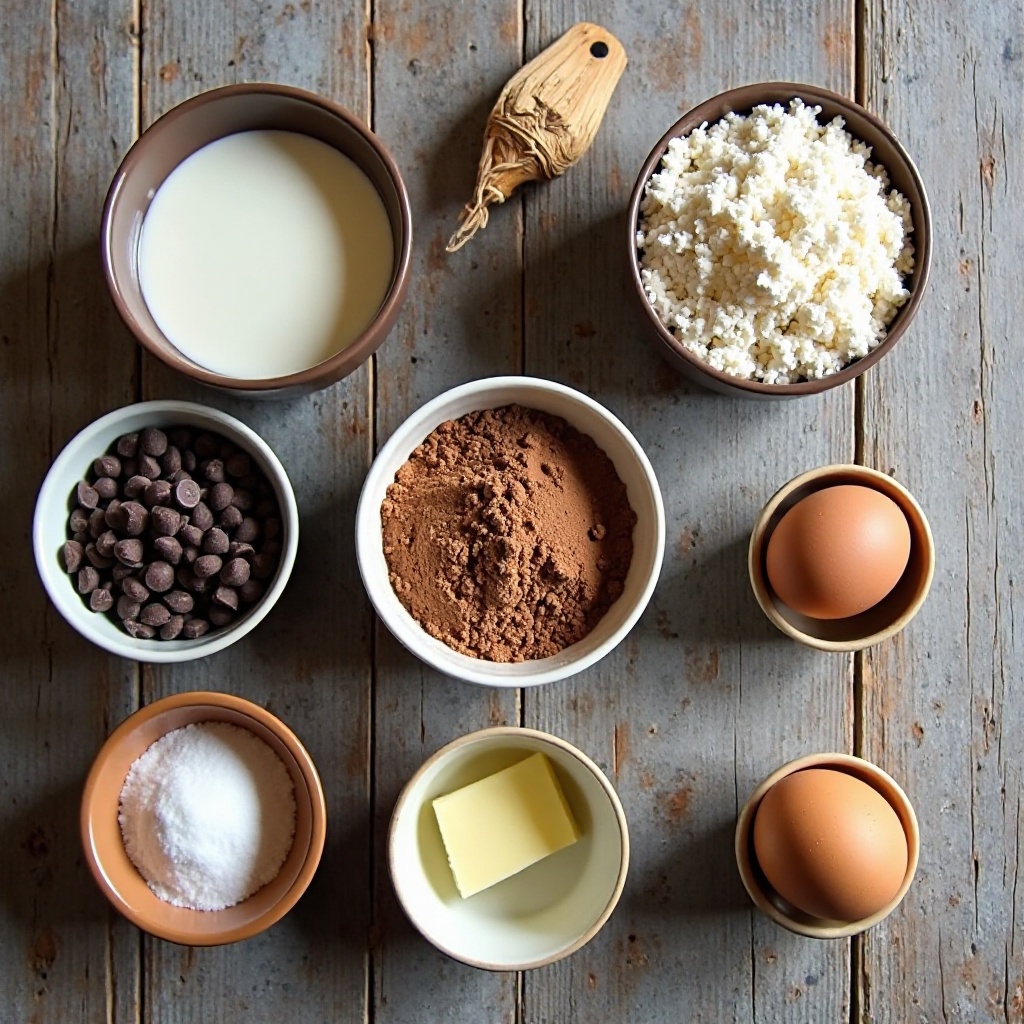
Key Ingredients for Chocolate Sourdough Bread in Cups
- 1 cup (240g) active sourdough starter – bubbly and fed within 4-12 hours
- ¾ cup (180ml) warm milk – whole milk works best for richness
- 3 cups (360g) all-purpose flour – or bread flour for chewier texture
- ⅓ cup (30g) unsweetened cocoa powder – Dutch-processed for deeper color
- ¼ cup (50g) granulated sugar – adjust to taste
- 1 teaspoon salt – enhances all flavors
- 3 tablespoons (42g) softened butter – adds tenderness
- ½ cup (90g) chocolate chips – semi-sweet or dark chocolate
- 1 large egg – for richness and structure
- Butter for greasing cups – or use baking spray
Step-by-Step Instructions
Step 1: Prepare Your Sourdough Mixture
In a large mixing bowl, combine your active sourdough starter with warm milk. The milk should be just warm to touch, around 100°F. Stir until well blended. This creates your liquid base and starts activating the wild yeasts in your starter.
Step 2: Mix the Dry Ingredients
In a separate bowl, whisk together the flour, cocoa powder, sugar, and salt. Make sure the cocoa powder is evenly distributed with no lumps. This ensures consistent chocolate flavor throughout your bread. The whisking also aerates the flour, leading to lighter bread.
Step 3: Combine Wet and Dry Ingredients
Add the dry mixture to your sourdough-milk mixture. Crack in the egg and add the softened butter. Using a wooden spoon or your hands, mix everything together until a shaggy dough forms. Don’t worry if it looks messy at this point. That’s perfectly normal!
Step 4: Knead the Dough
Turn the dough onto a lightly floured surface and knead for about 8-10 minutes. The dough should become smooth and elastic. It will be slightly sticky due to the chocolate content, so resist adding too much extra flour. When properly kneaded, it should spring back when poked.
Step 5: Add Chocolate Chips
Flatten the dough into a rectangle and sprinkle the chocolate chips over the surface. Fold the dough over itself and knead gently for another 2-3 minutes to distribute the chips evenly throughout. Some chips may peek through the surface, which is fine!
Step 6: First Rise
Place the dough in a greased bowl, turning once to coat all sides. Cover with a damp kitchen towel or plastic wrap. Let it rise in a warm spot for 4-6 hours until doubled in size. The timing depends on your kitchen temperature and starter strength. Warmer environments speed up fermentation.
Step 7: Shape into Cups
Generously butter 6-8 ramekins or oven-safe cups (about 6-8 oz capacity each). Punch down the risen dough to release gases. Divide it into 6-8 equal portions using a kitchen scale for uniformity. Shape each portion into a smooth ball by pulling the edges underneath. Place one ball in each prepared cup.
Step 8: Second Rise
Cover the cups loosely with plastic wrap or a kitchen towel. Let them rise for another 1-2 hours until the dough rises about 1 inch above the rim of the cups. They should look puffy and slightly domed. This second rise is crucial for the final texture.
Step 9: Bake to Perfection
Preheat your oven to 375°F (190°C). Place the cups on a baking sheet for easier handling. Bake for 25-30 minutes until the tops are set and spring back when lightly touched. The internal temperature should reach 190-200°F if you’re using a thermometer. The tops will develop a beautiful dark brown color.
Step 10: Cool and Serve
Remove from the oven and let cool in the cups for 5 minutes. Run a butter knife around the edges and gently turn out onto a cooling rack. Serve warm for the ultimate chocolate experience, or let cool completely for easier slicing. The aroma alone will have everyone gathering in your kitchen!
What to Serve Chocolate Sourdough Bread in Cups With
These versatile cups shine in multiple serving scenarios. For breakfast, pair them with creamy butter and your favorite jam, or enjoy with a hot cup of coffee or cappuccino.
At brunch, serve alongside fresh fruit salad, scrambled eggs, or yogurt parfaits. The slight tanginess complements both sweet and savory items beautifully.
For an afternoon treat, these cups are magnificent with vanilla ice cream or whipped cream. A drizzle of chocolate sauce or caramel takes them over the top.
They also work wonderfully with tea time. Pair with Earl Grey or chai tea for a sophisticated afternoon break.
Looking for a dessert option? Serve warm with custard, cream cheese frosting on the side, or even a scoop of peanut butter for dipping. The combination of warm bread and cold toppings creates an irresistible contrast.

Top Tips for Perfecting Chocolate Sourdough Bread in Cups
Use Active, Fed Starter
Your sourdough starter should be at peak activity, meaning it’s doubled in size and bubbly. Feed it 4-12 hours before making this recipe. Weak starter results in dense, poorly risen bread.
Don’t Skip the Second Rise
While it’s tempting to rush, the second rise in the cups is essential for light, airy texture. Under-proofed bread will be dense and gummy inside. Be patient and let them rise properly above the rim.
Adjust Chocolate Intensity
For deeper chocolate flavor, use Dutch-processed cocoa instead of natural cocoa. You can also increase cocoa powder by 1-2 tablespoons, but balance it with an extra tablespoon of sugar to prevent bitterness.
Temperature Matters
If your kitchen is cold (below 68°F), rising times will extend significantly. Create a warm environment by placing dough near a warm oven, using a proofing box, or turning your oven light on with the door closed (don’t turn the oven on, just the light).
Prevent Sticking
Thoroughly grease your cups, including the rim. For extra insurance, line the bottom with a parchment circle. This makes removal foolproof and keeps your presentation pristine.
Substitute Ingredients Wisely
No milk? Use water with a tablespoon of butter added. Dairy-free? Substitute with almond or oat milk and vegan butter. For gluten-free versions, you’ll need a complete gluten-free sourdough starter and flour blend designed for bread, plus xanthan gum for structure.
Storing and Reheating Tips
Room Temperature Storage: Store completely cooled chocolate sourdough bread cups in an airtight container at room temperature for up to 3 days. Place parchment paper between layers if stacking to prevent sticking. The bread may dry slightly but remains delicious.
Refrigeration: For longer storage, refrigerate in an airtight container for up to 1 week. While refrigeration can dry out bread, the chocolate content helps maintain moisture. Bring to room temperature before serving for best flavor.
Freezing Instructions: These cups freeze beautifully! Wrap each cooled cup individually in plastic wrap, then place all wrapped cups in a freezer-safe bag. Remove as much air as possible. Freeze for up to 3 months. This is perfect for meal prep or making ahead for special occasions.
Thawing: Remove from freezer and let thaw at room temperature for 2-3 hours, still wrapped. This prevents moisture loss.
Reheating: For the best texture, reheat in a 300°F oven for 8-10 minutes until warmed through. Wrap in foil to prevent over-browning. Alternatively, microwave individual cups for 20-30 seconds on 50% power. For a crispy exterior, toast slices in a dry pan or under the broiler for 1-2 minutes.
Refreshing Day-Old Bread: If your cups have dried out slightly, brush lightly with melted butter or milk and warm in the oven at 325°F for 5-7 minutes. This revives the texture beautifully.
Nutrition Information
| Nutrient | Per Serving (1 cup) |
|---|---|
| Calories | 285 |
| Total Fat | 9g |
| Saturated Fat | 5g |
| Cholesterol | 40mg |
| Sodium | 320mg |
| Total Carbohydrates | 45g |
| Dietary Fiber | 3g |
| Sugars | 12g |
| Protein | 7g |
Note: Nutritional values are approximate and based on 8 servings. Actual values may vary depending on specific ingredients used.
Common Baking Mistakes to Avoid
Using Unfed or Inactive Starter
This is the number one mistake! Your starter needs to be at its peak, bubbly, and doubled after feeding. Using starter straight from the fridge or one that hasn’t been fed results in flat, dense bread with poor rise. Always plan ahead and feed your starter 4-12 hours before baking.
Over-Kneading the Dough
While kneading develops gluten, over-kneading (especially with a mixer) can make the dough tough and break down structure. Knead by hand for better control. Stop when the dough is smooth and elastic, usually 8-10 minutes.
Adding Too Much Flour
Chocolate dough is naturally stickier than plain bread dough. Resist the urge to add excessive flour during kneading. A slightly tacky dough produces tender bread. Only add flour if the dough is completely unworkable and sticking to everything.
Skipping the First Rise or Rushing It
Sourdough needs time for flavor development and proper fermentation. Rushing the first rise means less tangy flavor and poor texture. Give it the full 4-6 hours, or even longer in cold kitchens. The dough should truly double in size.
Filling Cups Too Full
Only fill cups about halfway to two-thirds full. The dough needs room to expand during the second rise and baking. Overfilled cups will overflow and create a mess, plus the bread won’t bake evenly.
Baking at Wrong Temperature
Too hot, and the outside burns before the inside cooks. Too cool, and you get dense, gummy centers. Use an oven thermometer to verify your actual oven temperature. 375°F is the sweet spot for these cups.
Not Greasing Cups Adequately
Few things are more frustrating than bread stuck in cups! Use generous amounts of butter or baking spray, getting into all corners and up the sides. Don’t be shy with the grease.
Removing from Cups Too Soon
Let the bread rest in cups for 5 minutes after baking. This allows the structure to set. Removing immediately causes the bread to fall apart or stick more stubbornly.
Inconsistent Portion Sizes
Eyeballing dough portions leads to uneven baking. Some cups finish while others need more time. Use a kitchen scale to divide dough equally. Each portion should be about 80-100g for 6 cups or 60-75g for 8 cups.
Opening Oven Door Too Often
Resist checking on your bread every few minutes! Each time you open the door, temperature drops and affects rise. Trust the process and only check after 20 minutes of baking.
Frequently Asked Questions
Can I make chocolate sourdough bread in cups without a stand mixer?
Absolutely! This recipe is designed to work perfectly with hand mixing and kneading. In fact, I prefer hand kneading for this dough because you can better feel the texture and avoid over-working it. Just mix with a wooden spoon initially, then knead by hand on a floured surface for 8-10 minutes. Your arms will get a workout, but the results are worth it!
Why didn’t my chocolate sourdough bread rise properly?
Several factors could be at play. First, check your sourdough starter’s activity level. It should be bubbly and doubled after feeding. Second, consider your kitchen temperature. If it’s cold (below 68°F), rising will take much longer. Third, ensure you’re giving adequate time for both rises. Finally, old or weak yeast in your starter might need refreshing with several consecutive feedings over a few days.
Can I use a different type of chocolate in this recipe?
Yes! Feel free to experiment with dark chocolate, milk chocolate, white chocolate chips, or even chunks of your favorite chocolate bar. Dark chocolate creates a more sophisticated, less sweet version. White chocolate makes them sweeter and creates interesting color contrast. Chopped chocolate bars distribute differently than chips and create pockets of melted chocolate.
How do I know when my chocolate sourdough bread cups are fully baked?
The tops should spring back when lightly touched and appear set rather than jiggly. The most reliable method is using an instant-read thermometer inserted into the center. It should read 190-200°F. Visually, the tops will be dark brown with chocolate and slightly pulling away from the cup edges. If you’re unsure, it’s better to bake an extra 3-5 minutes than underbake.
Can I make this recipe dairy-free?
Definitely! Replace regular milk with your favorite plant-based milk like almond, oat, or soy milk. Substitute the butter with vegan butter or coconut oil. Use dairy-free chocolate chips. The texture and flavor remain excellent with these substitutions. Some readers have reported that oat milk provides the closest richness to whole dairy milk.
What size cups or ramekins should I use?
Six to eight-ounce ramekins or oven-safe cups work perfectly. You can also use large muffin tins, though the shape will be different. Smaller cups (4 oz) work too but will need reduced baking time, around 18-22 minutes. Larger cups (10-12 oz) need longer baking, about 35-40 minutes. Adjust based on your preference for portion size.
My dough is very sticky, is this normal?
Yes! Chocolate dough tends to be stickier than plain bread dough due to the cocoa powder and chocolate chips. As long as you can knead it (even if some sticks to your hands), you’re fine. Lightly oil your hands if needed, but resist adding too much extra flour. Sticky dough creates tender bread. The dough will become less sticky as it rises and gluten develops.
Can I prepare the dough the night before?
Yes, and this actually enhances flavor! After the first rise, punch down the dough, shape into cups, cover tightly with plastic wrap, and refrigerate overnight. The next morning, remove from the fridge and let them come to room temperature for about 1 hour, then allow the second rise (which may take 1-2 hours since they’re cold). This cold fermentation creates deeper sourdough flavor.
How can I make my chocolate sourdough bread sweeter?
Increase the sugar to ½ cup instead of ¼ cup. Add an extra 2 tablespoons of chocolate chips. Use milk chocolate chips instead of semi-sweet or dark. You could also brush the tops with honey-butter glaze after baking or drizzle with chocolate ganache. Consider adding a teaspoon of vanilla extract for enhanced sweetness perception.
What’s the difference between sourdough chocolate bread and regular chocolate bread?
Sourdough chocolate bread uses wild yeast and bacteria from a sourdough starter instead of commercial yeast. This creates complex tangy notes that balance the sweetness of chocolate. The fermentation process also makes the bread more digestible and gives it better keeping qualities. Regular chocolate bread is sweeter and more straightforward in flavor, while sourdough versions have depth and character.
Final Thoughts
Chocolate sourdough bread in cups represents the perfect intersection of artisan bread-making and modern convenience. These individual portions eliminate the intimidation factor of traditional sourdough loaves while delivering all the complex flavors you love.
Whether you’re a sourdough novice or an experienced baker, this recipe adapts beautifully to your skill level. The individual cups make portion control easy, presentations impressive, and gifting absolutely delightful.
I hope you’ll give this chocolate sourdough bread in cups recipe a try. There’s something magical about pulling those golden-brown cups from the oven, knowing you created something special from simple ingredients and wild yeast.
Remember, baking is both science and art. Don’t be discouraged if your first batch isn’t perfect. Each time you bake, you’ll learn more about your sourdough starter, your oven, and your own preferences. That’s the beautiful journey of sourdough baking!
Happy baking, friends! May your starter always be bubbly and your chocolate sourdough cups always rise perfectly.