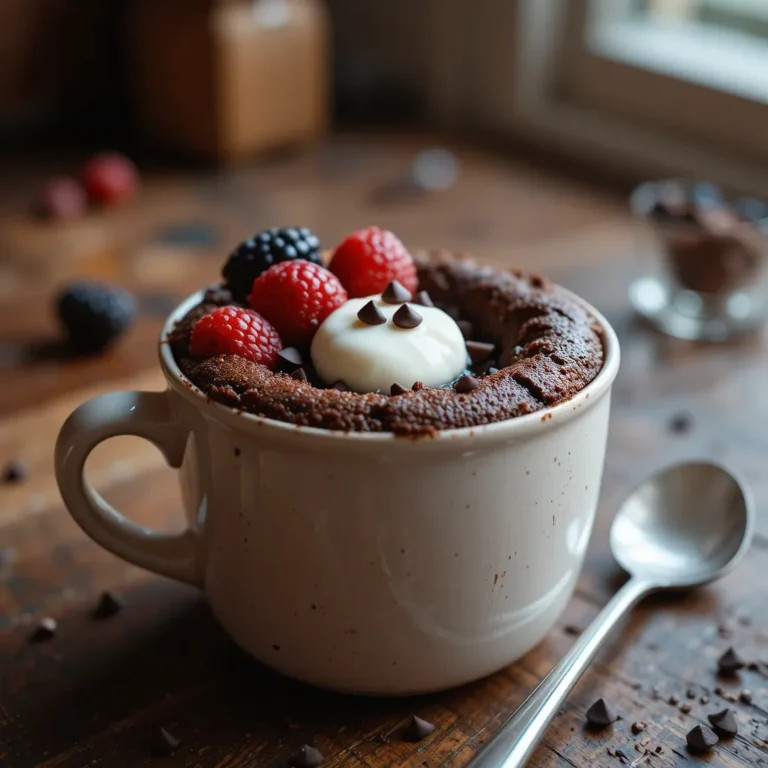
5 Minute Healthy Chocolate Mug Cake Recipe
Imagine this: it’s 9 PM, you’re craving something sweet, and the last thing you want is to dirty every bowl in your kitchen. Enter the healthy chocolate mug cake – your new best friend! This single-serving wonder delivers rich, fudgy chocolate satisfaction in just five minutes, all while keeping things nutritious.
I stumbled upon this game-changer during finals week in college, and it’s been my go-to ever since. Unlike my popular banana bread recipe that feeds a crowd, this beauty is all about YOU time. Ready to discover chocolate heaven in a mug?
What is a Healthy Chocolate Mug Cake?
Ever wonder why it’s called a “mug” cake? Well, because you literally make it IN a mug! Revolutionary, right? This isn’t your grandma’s elaborate layer cake – it’s a single-serving dessert that goes from craving to satisfaction faster than you can say “pass the chocolate.” The best part?
It’s actually good for you (relatively speaking). As they say, the way to anyone’s heart is through their stomach, and this little gem delivers joy without the guilt. Trust me, once you try this, you’ll never look at microwave desserts the same way again!
Why You’ll Love This Healthy Chocolate Mug Cake
Rich Chocolate Flavor Without the Guilt
This isn’t just another sad “healthy” dessert that tastes like cardboard. The combination of cocoa powder, a touch of natural sweetener, and wholesome ingredients creates a genuinely decadent experience. Every spoonful delivers that deep, chocolatey richness you crave, with a texture that’s somewhere between a brownie and a lava cake. The best part? You’re getting fiber, protein, and nutrients instead of empty calories.
Budget-Friendly Single Serving
Let’s talk money. A fancy bakery cupcake can set you back $5 or more, but this healthy chocolate mug cake costs less than 50 cents to make! You’re using pantry staples you probably already have, and there’s zero waste since you’re making exactly one portion. No more buying expensive desserts or watching half a cake go stale in your fridge. If you loved my economical overnight oats recipe, you’ll appreciate how this saves both time and money.
Customizable Toppings Paradise
Here’s where things get fun! Top your mug cake with fresh berries for antioxidants, a dollop of Greek yogurt for protein, a sprinkle of chopped nuts for crunch, or even a small square of dark chocolate that melts into pools of gooey goodness. Sliced bananas add natural sweetness, while a drizzle of nut butter creates restaurant-worthy presentation. The possibilities are endless, and each combination feels like a completely new dessert.
Ready to whip up your own? Let’s get baking (or should I say microwaving)!
How to Make Healthy Chocolate Mug Cake
Quick Overview
This healthy chocolate mug cake is incredibly simple – just mix, microwave, and devour! The whole process takes about 5 minutes from start to finish, making it perfect for late-night cravings or when unexpected guests drop by. The cake comes out moist and tender with a slightly gooey center (my favorite part!). No oven needed, no fancy equipment required, just one mug and a microwave.
Prep Time: 2 minutes
Cook Time: 1-2 minutes
Total Time: 5 minutes
Servings: 1 generous portion
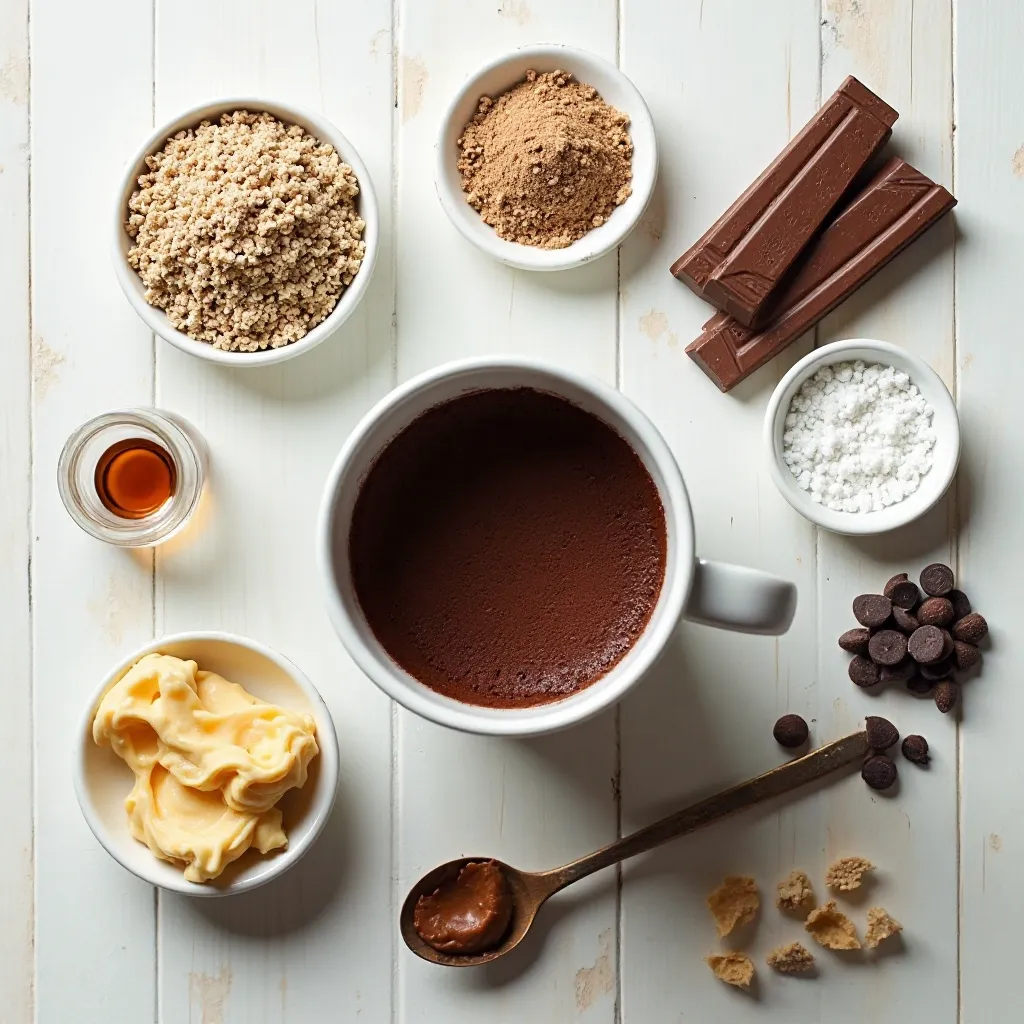
Key Ingredients for Healthy Chocolate Mug Cake
Dry Ingredients:
- 3 tablespoons whole wheat flour (or almond flour for gluten-free)
- 2 tablespoons unsweetened cocoa powder
- 1 tablespoon coconut sugar (or honey/maple syrup)
- 1/4 teaspoon baking powder
- Pinch of sea salt
Wet Ingredients:
- 3 tablespoons unsweetened almond milk (or any milk of choice)
- 1 tablespoon coconut oil, melted (or any neutral oil)
- 1/4 teaspoon vanilla extract
- 1 tablespoon unsweetened applesauce
Optional Add-ins:
- 1 tablespoon dark chocolate chips
- 1 teaspoon nut butter for a surprise center
Step-by-Step Instructions
Step 1: Prepare Your Mug Choose a microwave-safe mug that holds at least 12 ounces – the batter will rise as it cooks, and you don’t want a microwave explosion! Lightly spray the inside with cooking spray or rub with a tiny bit of coconut oil. This step is crucial for easy removal later.
Step 2: Mix the Dry Ingredients Add your whole wheat flour, cocoa powder, coconut sugar, baking powder, and salt directly into the mug. Use a fork to whisk everything together thoroughly, breaking up any lumps in the cocoa powder. Make sure the baking powder is evenly distributed – this is what makes your cake fluffy!
Step 3: Add the Wet Ingredients Pour in the almond milk, melted coconut oil, vanilla extract, and applesauce. The applesauce replaces eggs and adds moisture without extra fat. Stir vigorously with your fork until you have a smooth batter with no flour pockets. Don’t worry about overmixing – mug cakes are forgiving!
Step 4: Add Your Mix-ins If you’re using chocolate chips or want to create a molten center, press a teaspoon of nut butter into the center of the batter. Sprinkle chocolate chips on top – they’ll sink in slightly and create pockets of melted chocolate throughout.
Step 5: Microwave Magic Place your mug in the center of the microwave. Cook on high for 60-90 seconds. Every microwave is different, so start with 60 seconds. The cake is done when it’s risen and the center looks just set – it should still be slightly glossy on top. Remember, it will continue cooking from residual heat after you remove it.
Step 6: Cool and Enjoy Let the mug cake cool for 2-3 minutes before digging in. The mug will be HOT, so use an oven mitt! The cake will firm up slightly as it cools. Top with your favorite toppings and enjoy straight from the mug – no dishes needed!
What to Serve Healthy Chocolate Mug Cake With
This versatile dessert pairs beautifully with so many options! For a protein boost, serve alongside a glass of cold almond milk or top with a scoop of vanilla Greek yogurt. Fresh raspberries or strawberries add a tart contrast that cuts through the richness.
Want to make it feel more indulgent? A small scoop of vanilla ice cream or frozen yogurt turns this into an a-la-mode experience. For a cozy evening treat, pair it with herbal tea or a cup of hot chamomile.
If you’re serving this as a dinner party dessert (yes, really!), present it in a pretty mug with a dusting of powdered sugar, fresh mint leaves, and a few berries on the side. Your guests will be impressed by the presentation and shocked when you tell them it took 5 minutes to make!

Top Tips for Perfecting Healthy Chocolate Mug Cake
Don’t Overmix or Undermix
Stir your batter until just combined – about 20-30 seconds of vigorous mixing. You want a smooth consistency, but a few tiny lumps are okay. Overmixing can make the cake tough, while undermixing leaves flour pockets that taste raw.
Watch Your Microwave Time
Microwaves vary wildly in power. A 1000-watt microwave might need 60 seconds, while an 800-watt model might need 90 seconds. Start with less time and add 10-second increments if needed. The top should look just set but still slightly glossy. Overcooking creates a rubbery texture.
Choose the Right Mug Size
Use a mug that’s at least 12 ounces (about 1.5 cups capacity). The batter will nearly double in size as it cooks. Too small and it overflows; too large and it cooks unevenly. A wide, short mug works better than a tall, narrow one.
Flour Substitutions Matter
Whole wheat flour gives the best texture, but almond flour works for gluten-free diets (use the same amount). Oat flour creates a slightly denser cake. All-purpose flour works in a pinch but loses some nutritional value. Each flour absorbs liquid differently, so you might need to adjust by a teaspoon.
Sweetness Level Adjustments
Coconut sugar provides subtle caramel notes, but you can use the same amount of honey or maple syrup for liquid sweeteners. If using stevia or monk fruit, start with half the amount – these are much sweeter. Taste your batter (it’s safe!) and adjust before cooking.
The Applesauce Secret
Unsweetened applesauce keeps this cake moist and egg-free. Don’t skip it! If you don’t have applesauce, mashed banana works (though it adds banana flavor), or use one small egg whisked separately. The cake will be slightly less fluffy but still delicious.
Storing and Reheating Tips
Refrigeration: While this recipe is best enjoyed fresh, you can store a cooled mug cake covered with plastic wrap in the refrigerator for up to 2 days. The texture becomes denser and more brownie-like, which some people actually prefer!
Reheating: To reheat, microwave for 15-20 seconds. Add a teaspoon of milk before reheating to restore moisture. Be careful not to overheat or it will dry out.
Make-Ahead Dry Mix: Here’s a game-changer: measure out the dry ingredients in small containers or zip-top bags. Label each one and store in your pantry for up to 3 months. When a craving hits, just dump one packet into a mug, add wet ingredients, and microwave. It’s like having instant cake mix, but healthier!
Freezing: Honestly, this isn’t ideal for freezing since it’s so quick to make fresh. But if you must, wrap the cooled cake tightly in plastic wrap and freeze for up to 1 month. Thaw in the refrigerator overnight and reheat gently.
Nutrition Information
| Nutrient | Per Serving |
|---|---|
| Calories | 180 |
| Total Fat | 8g |
| Saturated Fat | 6g |
| Carbohydrates | 28g |
| Fiber | 5g |
| Sugar | 12g |
| Protein | 4g |
| Sodium | 120mg |
Note: Nutrition facts are approximate and vary based on specific ingredients used.
Frequently Asked Questions
Can I make this healthy chocolate mug cake without a microwave?
Absolutely! Preheat your oven to 350°F (175°C) and bake in an oven-safe mug or ramekin for 12-15 minutes. The texture will be slightly different – more cake-like and less gooey – but equally delicious. Check with a toothpick; it should come out with a few moist crumbs.
Why did my mug cake turn out rubbery?
Rubbery texture usually means overcooking. Microwave times vary significantly, so reduce your cooking time by 10-15 seconds next time. The cake should look just set on top, not completely dry. Remember, it continues cooking from residual heat after removal.
Can I use regular all-purpose flour instead of whole wheat?
Yes, you can substitute all-purpose flour 1:1 for whole wheat flour. The cake will be slightly fluffier but less nutritious. You might need to reduce the liquid by a teaspoon since all-purpose flour absorbs less moisture than whole wheat.
Is this recipe suitable for people with diabetes?
This recipe uses less sugar than traditional mug cakes and includes fiber from whole wheat flour, which helps slow sugar absorption. However, everyone’s needs are different. You can reduce the sugar further or use a sugar substitute like stevia. Always consult with your healthcare provider about dietary choices.
Can I double this recipe to serve two people?
It’s better to make two separate mug cakes than doubling in one mug. The cooking time becomes unpredictable with larger portions, and you risk uneven cooking. Plus, everyone gets their own personal dessert, which feels more special!
What’s the best cocoa powder to use?
Unsweetened cocoa powder works best – either natural or Dutch-processed. Natural cocoa powder has a more intense chocolate flavor, while Dutch-processed is smoother and less acidic. Avoid hot chocolate mix or sweetened cocoa powders as they contain added sugar and milk solids that alter the recipe.
Can I make this vegan?
This recipe is already vegan-friendly! Just ensure your chocolate chips (if using) are dairy-free. The applesauce replaces eggs perfectly, and plant-based milk works great. Check that your sugar is vegan as some brands use bone char in processing.
Why did my cake overflow in the microwave?
Your mug was too small! The batter nearly doubles in volume when cooking. Use a mug that’s at least 12 ounces, and fill it only halfway with batter. If you want to make a larger portion, use a bigger mug or make two separate cakes.
Tips for Avoiding Common Baking Mistakes
Mistake #1: Skipping the Spray Even if your mug looks non-stick, give it a light spray or oil. There’s nothing worse than a perfect cake that won’t come out of the mug! I learned this the hard way during my first attempt.
Mistake #2: Using Cold Ingredients Let your ingredients come to room temperature for 5 minutes before mixing. Cold milk can cause the melted coconut oil to solidify into lumps, creating an uneven texture. This small step makes a big difference!
Mistake #3: Measuring Flour Incorrectly Don’t pack your flour into the measuring spoon – this adds too much flour and creates a dense, dry cake. Spoon the flour lightly into your tablespoon and level it off with a knife for accurate measurement.
Mistake #4: Uneven Mixing Make sure to scrape the bottom and sides of your mug while mixing. Flour loves to hide in corners, creating raw pockets in your finished cake. Use a fork and really get in there!
Mistake #5: Opening the Microwave Too Soon Resist the urge to check on your cake every 10 seconds! Opening the door releases heat and steam, extending cooking time and potentially deflating your cake. Set the timer and walk away.
Mistake #6: Not Adjusting for Altitude If you live at high altitude (above 3,000 feet), reduce your baking powder by a pinch and increase liquid by half a tablespoon. The lower air pressure affects how cakes rise and can cause overflow or collapse.
Mistake #7: Using the Wrong Cocoa-to-Flour Ratio Don’t add extra cocoa thinking it will make the cake more chocolatey – too much cocoa creates a dry, crumbly texture. If you want more chocolate flavor, add a small handful of chocolate chips instead.
There you have it – your complete guide to making the perfect healthy chocolate mug cake! This recipe has saved me countless times when I needed something sweet but didn’t want to derail my healthy eating goals. The beauty of this dessert is its flexibility – adjust the sweetness, play with toppings, or sneak in some vegetables (yes, you can add a tablespoon of grated zucchini and no one will know!).
I’d love to hear how yours turns out! Did you add any creative toppings? Did you make it gluten-free or try a different flour? Share your variations in the comments below and help inspire others to create their perfect version of this healthy chocolate mug cake. Happy baking (or should I say microwaving)!
Pin this recipe for later and follow me for more quick, healthy dessert ideas that won’t leave you feeling guilty!