Best Strawberry Shortcake Birthday Cake – Step-by-Step Guide
Picture this: fluffy vanilla cake layers, clouds of whipped cream, and juicy strawberries cascading down the sides. That’s the magic of a strawberry shortcake birthday cake! I still remember the first time I made this for my daughter’s seventh birthday—the gasps from her friends when I brought it out were absolutely priceless.
This cake transforms the beloved classic dessert into a showstopping celebration centerpiece that’s surprisingly simple to create. Unlike my popular chocolate layer cake, this recipe keeps things light, fresh, and perfect for spring and summer celebrations. You’ll love how the sweet berries complement the tender crumb, and trust me, your guests will be asking for seconds!
What is Strawberry Shortcake Birthday Cake?
Ever wonder why we call it “shortcake” when there’s nothing short about how amazing it tastes? The name actually comes from the “short” or crumbly texture created by adding fat to the dough. This birthday version takes that classic concept and transforms it into a multilayered celebration cake that’ll make everyone’s heart skip a beat.
After all, they say the way to anyone’s heart is through their stomach, right? Go ahead and bake this beauty—you’ll understand why it’s been stealing hearts at birthday parties for generations!
Why You’ll Love This Strawberry Shortcake Birthday Cake
Fresh, Seasonal Flavors That Shine
The star of this cake is undoubtedly the fresh strawberries. When strawberries are in season, their natural sweetness pairs beautifully with the light vanilla cake and billowy whipped cream. Each bite delivers a perfect balance of textures—soft cake, creamy frosting, and juicy fruit. It’s like eating summer on a plate!
Budget-Friendly Bakery-Style Results
Here’s a little secret: bakery birthday cakes can cost upward of fifty dollars. Making this strawberry shortcake birthday cake at home costs a fraction of that price, and honestly, it tastes even better. You’re using real ingredients—no artificial flavors or preservatives. Plus, there’s something incredibly special about serving a homemade cake at a birthday celebration.
Customizable and Crowd-Pleasing
What I adore most about this recipe is its versatility. You can adjust the sweetness, add different berries, or even incorporate a hint of lemon zest. It’s similar to my vanilla celebration cake but with that signature strawberry twist that makes it uniquely refreshing. Whether you’re celebrating a child’s birthday or an elegant adult gathering, this cake adapts beautifully to any occasion. Ready to create some birthday magic? Let’s get baking!
How to Make Strawberry Shortcake Birthday Cake
Quick Overview
- Prep Time: 30 minutes
- Baking Time: 25-30 minutes
- Cooling Time: 1 hour
- Assembly Time: 20 minutes
- Total Time: 2 hours 15 minutes
- Servings: 12-14 slices
This cake is surprisingly straightforward to make. The vanilla cake layers are light and tender, perfect for soaking up the strawberry juices. The homemade whipped cream frosting is stable enough for decorating but still maintains that cloud-like texture. What really makes this special is the macerated strawberries—letting them sit with a bit of sugar draws out their natural juices, creating a luscious syrup that flavors every layer.
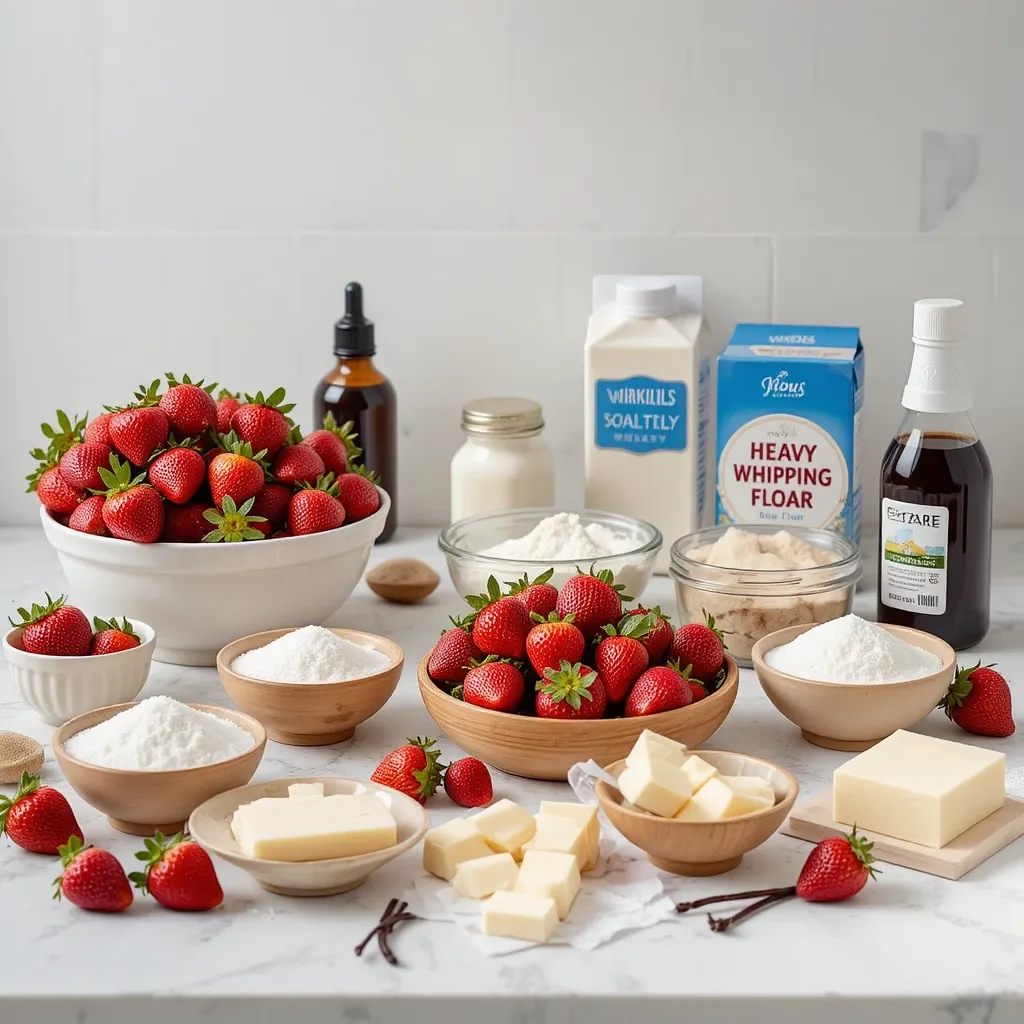
Key Ingredients for Strawberry Shortcake Birthday Cake
For the Cake Layers:
- 2¾ cups all-purpose flour
- 2½ teaspoons baking powder
- ½ teaspoon salt
- 1 cup unsalted butter, softened
- 1¾ cups granulated sugar
- 4 large eggs, room temperature
- 2 teaspoons pure vanilla extract
- 1 cup whole milk, room temperature
For the Strawberry Filling:
- 2 pounds fresh strawberries, hulled and sliced
- ¼ cup granulated sugar
- 1 tablespoon lemon juice
For the Whipped Cream Frosting:
- 3 cups heavy whipping cream, cold
- ¾ cup powdered sugar
- 2 teaspoons vanilla extract
- ¼ cup cream cheese, softened (for stability)
Step-by-Step Instructions
Step 1: Prepare the Strawberries
Start by macerating your strawberries. In a large bowl, combine the sliced strawberries with ¼ cup sugar and lemon juice. Gently toss everything together and let it sit at room temperature for at least 30 minutes. This process draws out the strawberry juices, creating a naturally sweet syrup. I usually do this step first so the berries are ready when I need them. Set aside about 1 cup of the prettiest slices for decorating the top of your cake.
Step 2: Make the Cake Batter
Preheat your oven to 350°F (175°C). Grease and flour three 8-inch round cake pans, then line the bottoms with parchment paper. This extra step prevents sticking and ensures perfect layers every time.
In a medium bowl, whisk together the flour, baking powder, and salt. Set this aside. In a large mixing bowl or stand mixer, cream the softened butter and sugar together on medium-high speed for about 4-5 minutes. The mixture should look pale and fluffy—this incorporates air for a lighter cake.
Step 3: Add Eggs and Vanilla
Add the eggs one at a time, beating well after each addition. Scrape down the sides of the bowl between eggs to ensure everything incorporates evenly. Mix in the vanilla extract. The batter might look slightly curdled at this point—that’s perfectly normal!
Step 4: Combine Wet and Dry Ingredients
With your mixer on low speed, add the flour mixture in three additions, alternating with the milk. Begin and end with the flour. Mix just until combined after each addition—overmixing can create a tough cake. The batter should be smooth and slightly thick, falling in ribbons from the spoon.
Step 5: Bake the Layers
Divide the batter evenly among the three prepared pans. I like to use a kitchen scale to ensure equal layers, but eyeballing it works too. Bake for 25-30 minutes, or until a toothpick inserted in the center comes out clean. The tops should spring back when lightly pressed. Let the cakes cool in the pans for 10 minutes, then turn them out onto wire racks to cool completely. This usually takes about an hour.
Step 6: Prepare the Whipped Cream Frosting
While the cakes cool, make your frosting. Chill your mixing bowl and whisk attachment in the freezer for 10 minutes—cold equipment helps the cream whip faster and hold better.
Beat the cream cheese until smooth and fluffy. Add the cold heavy cream, powdered sugar, and vanilla extract. Start mixing on low speed to avoid splattering, then gradually increase to high speed. Beat until stiff peaks form, about 3-4 minutes. The frosting should hold its shape when you lift the beaters. Don’t overbeat, or you’ll end up with butter!
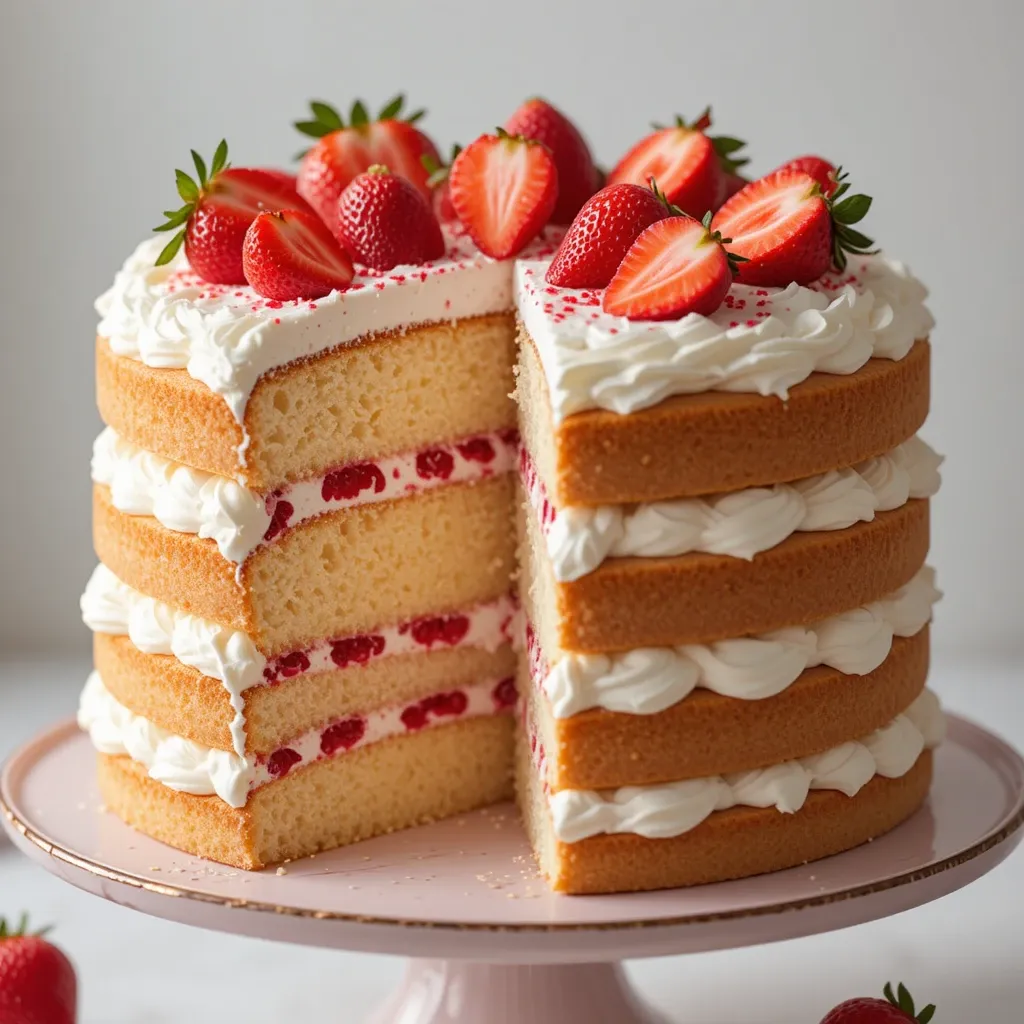
Step 7: Assemble the Cake
Place your first cake layer on a serving plate or cake stand. Using a pastry brush, lightly brush some of the strawberry syrup over the cake—this adds incredible flavor and moisture. Spread about 1 cup of whipped cream frosting over the layer, then top with half of the macerated strawberries (reserving the pretty ones for decorating).
Add the second layer and repeat the process: brush with syrup, spread frosting, add strawberries. Place the final layer on top and brush with syrup one last time.
Step 8: Frost and Decorate
Use the remaining whipped cream frosting to cover the top and sides of the cake. You can do a rustic “naked cake” look by applying a thin layer that lets the cake peek through, or go for full coverage. I prefer a textured finish—it looks homemade in the best way.
Arrange your reserved strawberry slices on top in whatever pattern makes you happy. I sometimes add a few around the base too. Fresh mint leaves make a lovely garnish if you have them on hand.
Step 9: Chill Before Serving
Refrigerate the assembled cake for at least 30 minutes before serving. This helps everything set and makes slicing much cleaner. The cake can be made a few hours ahead, which is perfect for party planning!
What to Serve Strawberry Shortcake Birthday Cake With
This cake is stunning enough to stand alone, but here are some pairing ideas that work beautifully:
- Vanilla ice cream: A small scoop alongside a slice creates an irresistible combination, especially for summer birthdays.
- Fresh fruit salad: Continue the fresh fruit theme with a colorful medley of melon, grapes, and berries.
- Sparkling fruit punch: A refreshing beverage that complements the strawberry flavors without competing.
- Coffee or tea: For adult gatherings, a good cup of coffee balances the sweetness perfectly.
- Chocolate-covered strawberries: Go all out with elegant chocolate-dipped berries as a side treat.
Top Tips for Perfecting Strawberry Shortcake Birthday Cake
Use Room Temperature Ingredients
This is crucial for a smooth batter. Cold eggs and milk can cause the butter to seize up, creating a lumpy mixture. Take everything out of the fridge about 30 minutes before baking.
Don’t Skip the Cream Cheese in Frosting
Just a quarter cup makes the whipped cream stable enough to hold up for hours without weeping or deflating. It doesn’t add a noticeable flavor but makes all the difference in structure.
Choose the Right Strawberries
Look for bright red, fragrant berries without white shoulders. Smaller strawberries are often sweeter than massive ones. If your berries are tart, add an extra tablespoon of sugar when macerating.
Level Your Cake Layers
Use a serrated knife or cake leveler to trim any domed tops. This creates a flat, stable base for stacking and prevents your cake from leaning like the Tower of Pisa.
Prevent Soggy Cake
Drain excess juice from your macerated strawberries before adding them between layers. Save that juice for brushing on the cake instead. Too much liquid can make the layers soggy.
Make Ahead Strategy
Bake the cake layers the day before. Wrap them tightly in plastic wrap and refrigerate. They’ll actually be easier to handle when cold, and the flavor improves overnight.
Storing and Reheating Tips
Refrigeration: This cake must be refrigerated because of the fresh whipped cream and strawberries. Cover it loosely with plastic wrap or keep it in a cake carrier. It will stay fresh for 2-3 days, though the strawberries may release more juice over time.
Freezing: I don’t recommend freezing the assembled cake because the strawberries become mushy and the whipped cream breaks down. However, you can freeze unfrosted cake layers wrapped tightly in plastic wrap and aluminum foil for up to 2 months. Thaw in the refrigerator overnight before assembling.
Serving: Take the cake out of the refrigerator about 10-15 minutes before serving. This takes the chill off the whipped cream and makes it taste even better. The cake is best enjoyed within the first day or two when the strawberries are at their freshest and the frosting is at peak texture.
Leftover Slices: Store individual slices in airtight containers in the refrigerator. They make wonderful next-day treats with your morning coffee!
Common Baking Mistakes to Avoid
Mistake 1: Opening the Oven Door Too Early
Resist the urge to check your cake before 20 minutes of baking. Opening the door releases heat and can cause the cake to sink in the middle. Trust the process!
Mistake 2: Overmixing the Batter
Once you add the flour, mix just until you can’t see any more white streaks. Overmixing develops gluten, which makes the cake tough and dense instead of tender and fluffy.
Mistake 3: Using Old Baking Powder
Baking powder loses its potency over time. Test yours by adding a teaspoon to hot water—if it doesn’t fizz vigorously, it’s time to replace it. Old baking powder equals flat, dense cake.
Mistake 4: Frosting a Warm Cake
This is the fastest way to end up with melted frosting soup. Your cake layers must be completely cool, and I mean cold to the touch. Patience pays off here!
Mistake 5: Whipping Cream Too Long
Stop beating as soon as stiff peaks form. Continue past this point, and you’re on your way to making butter. Watch carefully during the last minute of whipping.
Mistake 6: Skipping the Parchment Paper
Even in greased and floured pans, cakes can stick. Parchment paper circles on the bottom ensure easy release every single time. It takes 30 seconds and saves so much frustration.
Mistake 7: Using Frozen Strawberries
Frozen berries release too much water when thawed, making everything soggy. Fresh is essential for this recipe. If fresh strawberries aren’t in season, consider making a different cake.
Frequently Asked Questions
Can I make this cake ahead of time?
Yes, but with limitations. Bake the cake layers up to 2 days ahead and store them wrapped in the refrigerator. Make the whipped cream frosting and assemble the cake the day you plan to serve it. Assembled, it’s best within 24 hours for optimal freshness and texture.
Can I use frozen strawberries?
I strongly advise against it. Frozen strawberries release too much liquid when thawed, which makes the cake layers soggy and the filling watery. Fresh strawberries are essential for both flavor and texture in this recipe.
Why is my whipped cream frosting runny?
Several reasons: your cream wasn’t cold enough, you didn’t add the cream cheese stabilizer, or you didn’t beat it long enough. Make sure your cream is very cold and beat until you see stiff peaks that hold their shape.
How do I transport this cake?
This cake is delicate because of the whipped cream frosting. Use a cake carrier if possible and keep it refrigerated until the last moment. Drive carefully—sharp turns are not this cake’s friend! If traveling far, consider assembling it at your destination.
Can I use store-bought cake mix?
Technically yes, but the texture won’t be quite as tender. If you do use a mix, prepare it according to package directions for a white or vanilla cake. The homemade version truly is worth the extra effort, though.
What if I don’t have three cake pans?
Bake in batches! Make the full batter, divide it evenly, and bake one or two layers at a time. Keep the unbaked batter covered at room temperature while the first batch bakes. The slight wait won’t affect the final result.
How do I keep the layers from sliding?
Make sure each layer is completely level. You can also insert a few drinking straws or wooden dowels through the center of the stacked cake for extra support, especially if it’s a warm day.
Can I add other berries?
Absolutely! Raspberries, blueberries, or sliced peaches would be delicious. Just keep the total amount of fruit the same as the strawberry measurement. Mixed berries create a beautiful, colorful effect.
Is this cake suitable for kids?
Yes, completely! It contains no artificial ingredients, and kids love the fresh strawberry flavor. My children prefer this to traditional buttercream cakes because it’s not overly sweet.
How many does this cake serve?
This makes 12-14 generous slices. If you’re serving at a party with other desserts, you could stretch it to 16 smaller slices. For fewer people, you could make two layers instead of three.
Nutrition Information
| Nutrient | Per Slice (1/12 of cake) |
|---|---|
| Calories | 485 |
| Total Fat | 28g |
| Saturated Fat | 17g |
| Cholesterol | 145mg |
| Sodium | 210mg |
| Total Carbohydrates | 52g |
| Dietary Fiber | 2g |
| Sugars | 35g |
| Protein | 6g |
| Vitamin C | 45mg (50% DV) |
| Calcium | 95mg (10% DV) |
Note: Nutrition information is approximate and will vary based on exact ingredients used and slice size.
Final Thoughts
There’s something magical about watching someone’s face light up when you bring out a homemade strawberry shortcake birthday cake. It represents celebration, love, and the joy of creating something beautiful with your own hands. This recipe has become my go-to for spring and summer birthdays, and I hope it becomes one of your favorites too.
The combination of tender vanilla cake, fresh strawberries, and billowy whipped cream frosting never fails to impress. It looks fancy but comes together with simple techniques that any home baker can master. Whether you’re celebrating a milestone birthday or just want to make an ordinary day special, this cake delivers both in taste and presentation.
Remember, baking is as much about the love you put into it as the ingredients you use. Don’t stress about perfection—even if your layers are slightly uneven or your frosting isn’t Instagram-smooth, the flavor will still be absolutely incredible. That’s the beauty of homemade desserts.